
AUTHORING: Create the Lip Sync Data (MILO)
So you want to make your characters lips move correctly, huh? Well, you've come to the right place! In this guide, you're going to create a properly-formatted MILO file that will help your characters properly lip sync with the song you're creating..
Notices
This may not work for Playstation 2 customs, as it's been reported that the lip sync is tied to the video.
What You'll Need
- A valid Rock Band MIDI, with a fully-charted
PART_VOCALStrack. - The Onyx Music Game Toolkit (Download from GitHub). For Wii users, the MILO-making tools may be the only useful thing here.
- (OPTIONAL) The corresponding song file.. If you have a MOGG, you can open it in Audacity; if you have a Bink, you'll have to play it using the RAD Video Tools.
- (OPTIONAL) Audacity (Download from their website). This actually also works on Mac and Linux, if you just happen to have either.
- (OPTIONAL) StackOverflow0x's MiloMod, available within various project repos.
Step ONE - Double-Check the MIDI
PART_VOCALS
You must chart all of the vocal notes and lyrics into the PART_VOCAL track of the MIDI. You must include at least one [play] text event before the first vocal note in order to activate the animations, but you should place [play] and [idle] throughout the song when the vocalist stops (between verses, etc.) and when they start up again. Give about a measure or two between the text event and the actual start/end of the singing, because the animation transition happens very quickly and looks unnatural if there's not sufficient space.
VENUE
For Rock Band and Rock Band 2, you are required to have a VENUE track with at the very least text events for [music_start], [music_end], and [end]. This is usually determined by the MILO for Rock Band 3, so if you're only charting for that title, no venue part is required in the MIDI.
BEAT
You are required to have a BEAT track, but there doesn't have to be anything in it.
HARM#
Optional, actually, but if you have multiple voices in the song, this is recommended to be charted in your MIDI.
Step TWO - Create the Lip Sync File
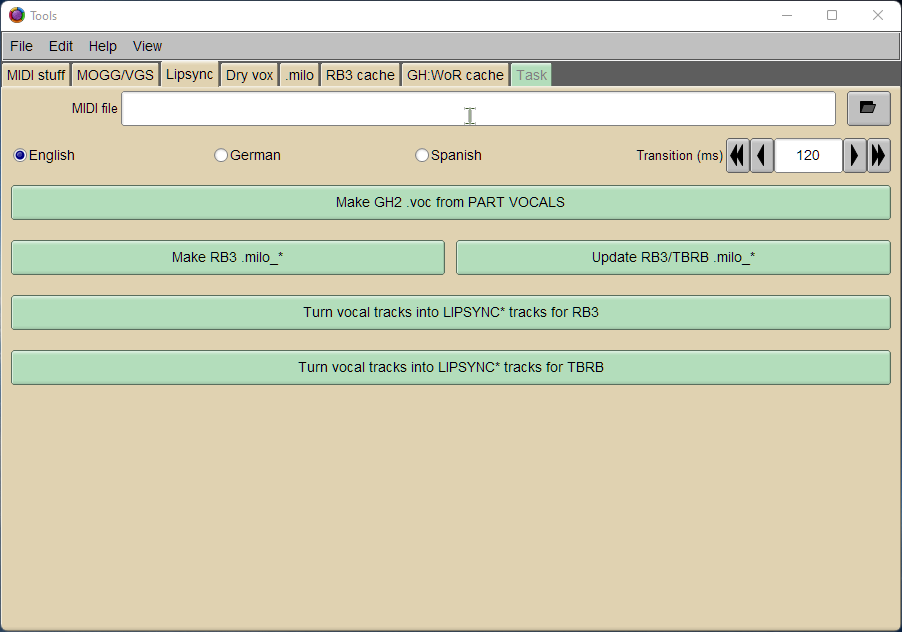
Load the songname.mid here and click the Make RB3 .milo_* button, making sure to replace the asterisk at the end with either xbox, ps3, or wii.
That's all there is to it, basically! However, maybe you want to edit an existing MILO file or create a DryVox file for use with other programs like MAGMA (which is not supported by our project, but is supported by the Onyx Tools). In that case, read on for other things you can do.
Edit the MILO File Details
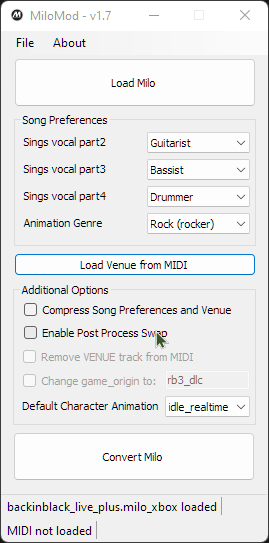
To better fine-tune the way the MILO behaves, especially you can use StackOverflow0x's MiloMod program to adjust the settings needed. Choose which members of the band will sing the additional harmony parts (Vocal Parts 2, 3, and 4), then select how you want the characters to act while playing (Animation Genre and Default Character Animation). You can also load the corresponding MIDI into MiloMod and alter it - tinker with the additional options to see what all you can do!
Create a DryVox (Dry Vocals) File for MAGMA
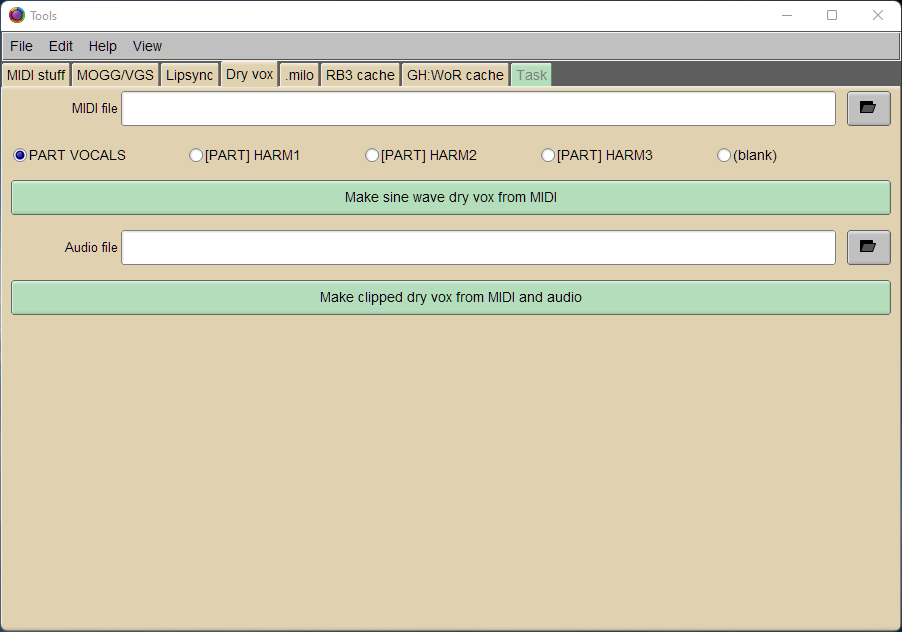
Depending on what MAGMA requires will depend on what kind of DryVox file you will make. For simple SINE wave vocals, load the MIDI for the song, choose the part you want to import, and click Make sine wave dry vox from MIDI. For more advanced vocal effects, also load the song and then click Make clipped dry vox from MIDI and audio.
Please Note:
As of December 30th, 2021, we do not link to or use C3 guides and software. Despite this, we respect members of our community's decision to continue using such; therefore, we have included this section on your behalf. For instructions on how to use your DryVox file, however, we recommend searching their forums and wikis for the relevant info.
(Advanced) Extract a MILO File
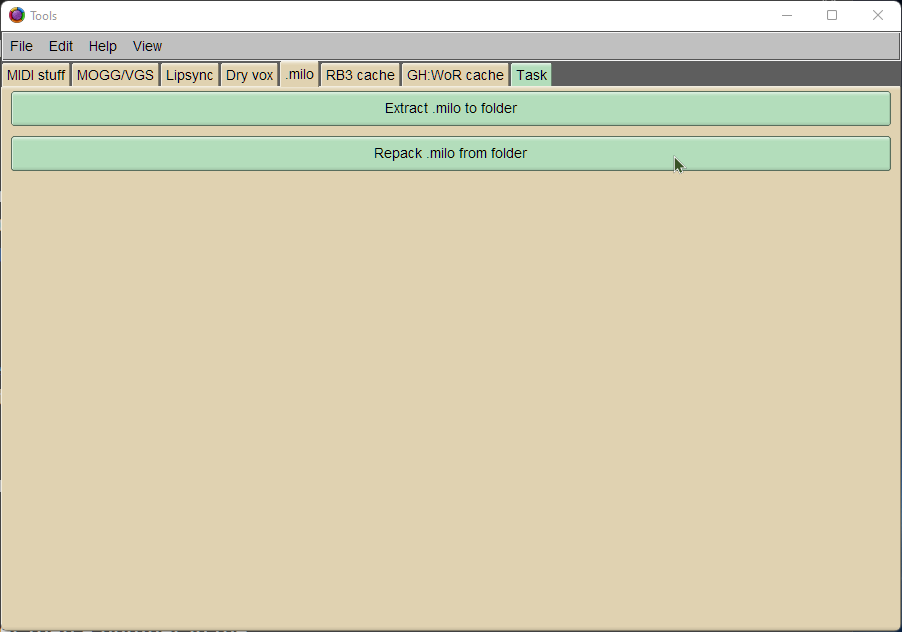
We don't have explicit instructions for this, but you can extract an entire MILO file and mess with the individual files. Most of the time, however, you don't really need this - the steps above automate everything that is required for customs. Regardless, you can unpack a MILO by clicking Extract .milo to folder and choosing the MILO file you want to unpack. To repack, click Repack .milo from folder and choose the folder containing the extracted files.